© 2026 Flywheel Co.
Development — 04.04.20
How to create a custom Laravel Nova Card : Step-by-step
Laravel Nova has quickly become one of my favorite parts of the entire Laravel ecosystem. In this article, I’ll go over some of the basics of extending Laravel Nova using custom cards. Cards can be very powerful and are designed to be shared, if you like. The primary focus of this article is to talk about how you can create a card so you can get started learning-by-doing.
This is the third article I’ve written about Nova and I’m excited to keep adding to that. The first article talked about how Laravel Nova might fit into our small agency and the second was a follow-up about working with Nova in 2020 after it had matured a bit and become more viable for us with customer facing administration panels.
What we’ll cover in this article.
- What are cards in Laravel Nova?
- Where and how can cards be displayed?
- What do I need to know to create a custom card?
- Creating a custom card; step-by-step. (If you want to get to the meat of the article, jump to this section.)
What are cards in Laravel Nova?
In Nova, cards are used to add additional information to your administration panel. Vague, I know. This is what the Laravel Nova documentation has to say about cards.
Cards are similar to resource tools, but are small, miniature tools that are typically displayed at the top of your dashboard, resource index, or resource detail screens. In fact, if you have used Nova metrics , you have already seen Nova cards. Custom Nova cards allow you to build own, metric-sized tools.
If you aren’t already familiar with the Nova terminology I’ll break it down a bit. Just like the name describes, they look like “cards” at the top of your admin pages. They come with a lot of features out of the box. For example, Metrics use cards to display their data. I’ll talk about the built-in Metrics and how you can use them in your application in another article. For now, we’ll focus on creating our own cards that display whatever information we want (with some caveats) and allow your users to interact with that data.
Where and how can cards be displayed?
You can display cards on your Dashboards, Resource indexes, and individual Resource detail pages. Registering a card to display on these pages is very straight forward and offers a few options with regards to sizing and ordering. Make no mistake, though… cards are opinionated in their display. Basically, you can set the width of your card and the order in which it’s displayed on screen in relation to other cards. That’s about it (at the time of this writing). If you want a card to be taller, or shorter, you’re out of luck. (If anyone has more information on sizing please let me know!)
According to the documentation your options for sizing are 1/3, 1/2, and full. These sizes are pretty self explanatory. 1/3 will display a card that is one third the size of your screen. 1/2 is, you guessed it, half of the size of your screen. The last sizing option is full which will span the entire width of your page. By default, cards will be displayed as 1/3.
To add a card, to a Resource or Dashboard for example, you’ll add it to the array returned in the cards() method. You can apply extra methods to your card instantiation to determine some extra display details as well. For this example we’ll assume you have a Nova Resource class called User.
// App\Nova\User
public function cards(Request $request)
{
	return [
		new MyCardClass, // This will display on the index of the resource
		(new MyCardClass)->onlyOnDetail(), // This will display only on the detail page of a resource
		(new MyCardClass)->width('1/3'), // The width of the card will be one third of the page
		(new MyCardClass)->width('2/3'), // The width of the card will be two thirds of the page
		(new MyCardClass)->width('full'), // The width of the card will be the full width of the page
		(new MyCardClass)->help('This will add a tooltip with helper text to your card.'),
		(new MyCardClass)->help(view('nova.my-card-class.tooltip))->render(), // Render as HTML
	];
}
I would also suggest that you take a look at the documentation for authorization methods that help you define which users have access to view your Cards.
What do I need to know to create a custom card?
First off, I want to say that you shouldn’t get discouraged by this list. We’ll walk through everything together.
Here are a few things to know off-the-top.
-
Custom cards have their own directory at the root of your Laravel application called
nova-components. This directory will hold most of your “custom” code for Nova and is the default directory where your new card will be held. If you don’t see that directory in your application, don’t worry, it will be created when you run the command to generate your custom card. - Cards use the underlying technology that Laravel Nova is built on… Namely NPM build processes, Vue.js, and some Tailwind CSS classes. Your code will need to be compiled using NPM each time you make a change to your code.
- A Laravel Nova Card is, at its core, a Vue.js component. If you’re familiar with Vue.js and the structure of Vue components then you’ll feel right at home.
Here are the main pieces of tech you’ll need to have an understanding of.
- Artisan - The first step to creating custom cards is using an Artisan command that is specific to Laravel Nova. If you’re reading this, you’re probably already familiar with Artisan and how that works within Laravel.
- NPM - You’ll use NPM to install dependencies and build your card so it can be accessed by your application.
- Laravel Routing - This isn’t exactly a necessity for a basic example but the more complex your cards become, the more you’ll integrate with your Laravel application.
- Vue.js - This is the main thing you’ll need to know. If you haven’t used it before, don’t worry.
Creating a custom card; step-by-6-easy-steps
Alright, I’m here. What are we building?
In this example we’re going to create a very simple custom card that will display a text input and a button. When that button is clicked, an email will be sent to the address that was typed into the form input. Pretty simple, right? We’ll call this card “MailCard”. By walking through these steps you’ll get a jump start to creating more complex cards before you know it. As with most code examples, I wouldn’t advise that you put this into production, but I hope this will demystify some of the process around creating and maintaining custom cards. Hopefully by the end of this article you’ll feel like tackling more complex cards and distributing them to the Laravel Nova community.

Step 1 - Creating the card
Use Artisan to create your card.
php artisan nova:card my-app/mail-card
When you run this command you’ll be asked a series of questions.
- “Would you like to install the card’s NPM dependencies? (yes/no)” - Enter “yes”. After that you’ll see output from NPM that is nova installing the required javascript dependencies to produce your card. This will also add some new scripts to your application’s package.json file.
- “Would you like to compile the card’s assets? (yes/no)” - Enter “yes”. Again you’ll see output on the screen from NPM. By entering “yes” you’re telling the code to run npm run development. This is the NPM script that will compile your card into code that can be run in your browser.
- “Would you like to update your Composer packages? (yes/no)” - Enter “yes”. This will update any composer dependencies needed for your card. As with anything composer related, it might take a minute or two for this process to finish. Namely it will add ”my-app/mail-card": “*” to your applications composer.json file which is a symlink to ./nova-components/MailCard
I know what you might be thinking… “This is confusing already”. Don’t worry though, you don’t need to fully understand everything that’s happening here. In my opinion, this is probably the part that makes people feel like it’s outside of their understanding and prevents most Nova developers from creating custom cards. Long story short, you can say “yes” to all three questions and you’re off and running.
Step 2 - Compiling your card
Your card exists and you get to actually work on code now! All of the files needed have been added to ./nova-components/MailCard, your NPM dependencies have been installed, and your application’s composer file has been updated to include the new card.
A key thing to know is that you will need to compile your card individually. This means you need to navigate to your new nova card and run commands from that directory. From your terminal window, change directories into your new Nova card.
cd nova-components/MailCard
Compiling your card’s code
Now you’ll use an NPM script included in your card’s package.json file to compile your card.
-
npm run dev- This will compile your card 1 time. You can run this every time you make a change to your card’s code. -
npm run watch- Recommended during development : This will monitor your code for any changes. Any time a change happens, your card will be compiled. This means you don’t need to runnpm run devevery time you make a change. To cancel the process you’ll need to presscommand + c. -
npm run prod- When you’re ready to send your card to production, run this command to minify your scripts and any styles you’ve added.
Step 3 - Add your new card to your default Nova Dashboard
Let’s add this card to your default Nova dashboard so we can see what it looks like. To do that you will add your card to the NovaServiceProvider.php file in the cards() method.
// NovaServiceProvider.php
protected function cards()
{
	return [
		new \MyApp\MailCard\MailCard,
	];
}
When you sign into Nova you’ll see your shiny new card on your default Nova dashboard! At this point it’ll only say “Mail Card” in the center and it will take up one third of the screen. You did it. You created a custom card. Let’s keep going and edit our card to display our text input and our button.
Let’s take a look at the Card.vue file
The main file you’ll deal with is your Card.vue file. This is located at ./nova-components/MailCard/resources/js/components/Card.vue. This is the Vue.js component that I mentioned previously. By default, your Card.vue file will be pre-populated with some boilerplate code.
<template>
    <card class="flex flex-col items-center justify-center">
        <div class="px-3 py-3">
            <h1 class="text-center text-3xl text-80 font-light">Mail Card</h1>
        </div>
    </card>
</template>

<script>
export default {
    props: [
        'card',

        // The following props are only available on resource detail cards...
        // 'resource',
        // 'resourceId',
        // 'resourceName',
    ],

    mounted() {
        //
    },
}
</script>
Step 4 - Editing your card
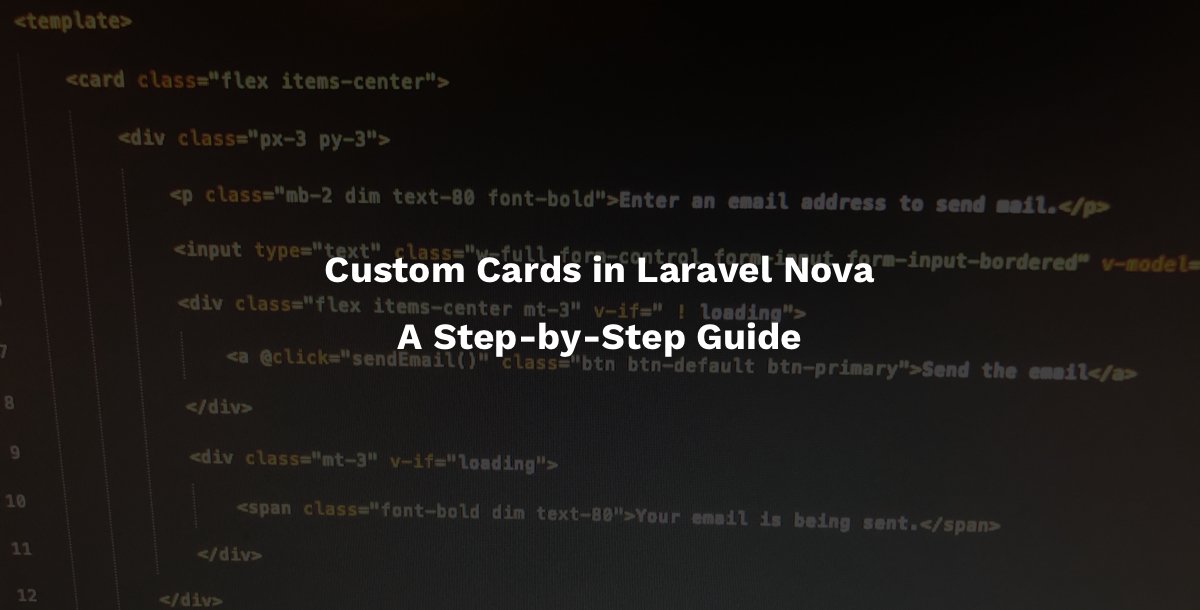
Open up your Card.vue file that was mentioned above. We’ll add a text input, a button, and some Vue.js code to asynchronously send an email. Here’s some boilerplate code to display that input and that button.
<template>
    <card class="flex items-center">
        <div class="px-3 py-3">
            <p class="mb-2 dim text-80 font-bold">Enter an email address to send mail.</p>
            <input type="text" class="w-full form-control form-input form-input-bordered" v-model="email">
            <div class="flex items-center mt-3" v-if=" ! loading">
                <a @click="sendEmail()" class="btn btn-default btn-primary">Send the email</a>
            </div>
            <div class="mt-3" v-if="loading">
                <span class="font-bold dim text-80">Your email is being sent.</span>
            </div>
        </div>
    </card>
</template>

<script>
export default {
    props: [
        'card',
    ],
    data() {
        return {
            loading : false,
            email : null
        }
    },
    mounted() {
        console.log(this.card);
    },
    methods : {
        sendEmail() {
            this.loading = true;
            axios.post('/nova-vendor/'+this.card.component+'/send-mail', {
                email: this.email
            }).then(response => {
                this.loading = false;
                if(response.data.code == 200) {
                    alert('Your email was sent to ' + this.email );
                }else{
                    alert('There was an error sending your email.');
                }
            }).catch(error => {
                this.loading = false;
                alert('There was an error sending your email.');
            });
        }
    },
}
</script>
Ok, what’s going on here?
Let’s break down what the code above is doing. If you’re familiar with Vue you shouldn’t have any problem following along. If you aren’t familiar with Vue, here are some bullet points about what this code is doing.
- The
<template>element is where your HTML lives to display a line of text telling the user to enter an email address, the text input, and the button. - Two Vue data parameters exist called
loadingandemail.- The
loadingparameter is a boolean that we will use to designate when the Vue component is communicating with your application to send the email. - The
emailparameter is a nullable string that will contain the email address you want to send to.
- The
- The text input is bound to your
emailparameter usingv-model=“email”. - The button has a Vue click event (
@click="sendEmail()") bound to it that calls thesendEmail()method from the Vuemethodsobject. - The
sendEmail()method does a few things :- Set the
loadingparameter totrue. - Use Axios to make an asynchronous post request to our
send-mailroute. (Don’t worry, this hasn’t been created yet… we’ll do that next)- By default, Axios is already included in Nova so you don’t need to import it or manually add it as a dependency.
- If the request is successful, alert the user that the email was sent.
- If the request fails, alert the user that the email was not sent.
- Set the
loadingparameter tofalsewhen everything is done… whether the post was successful or not.
- Set the
Step 5 - Create your card’s route to send mail
Are you still with me? I hope so… because we’re almost to the finish line. In Laravel Nova, each custom card has their own routes/api.php file that lets you set up routes exactly like you would in your Laravel application. This makes it easy to allow your card to communicate with your Laravel application. You’ll find your routes file in ./nova-components/MailCard/routes/api.php. Open up that file and we’ll create the new route to send the email.
I won’t go into the actual process of sending mail through Laravel but you’ll get the idea. Here’s an example api.php file.
<?php

use Illuminate\Http\Request;
use Illuminate\Support\Facades\Route;

Route::post('/send-mail', function (Request $request) {

    // This is where you'll send your mail
    // Mail::to($request->email)->send(new MyMailer());

    sleep(2);  // For example we'll sleep the process for 2 seconds before returning a response

    return response()->json([
        'code' => '200',
        'email' => $request->email
    ]);
});
Ok, what’s going on this time?
This is some straight-up Laravel code that you’ve probably seen before. Any routes defined in this api.php file will be available to your custom card (and your whole application… but these should be specific to your card.)
- We are creating a POST route called
/send-mail. - The full URI for this route is
/nova-vendor/mail-card/send-mail.- This is used in the Card.vue file in our axios request.
- This route returns a JSON response with a variable for
codeandemail.-
codeis set to 200 which will represent a successful HTTP request. -
emailwill return the email that was sent in the request.
-
- For example purposes we’ll sleep the process for 2 seconds to demonstrate the application actually doing something.
Now you can test your card. Go ahead, enter an email address (testing@test.com for example), and click Send the email. You should see an alert pop up that says “Your email was sent to testing@test.com”. That’s success, baby.
Step 6 - You’ve done it
That’s it… that’s all there is to it. (No sarcasm)
- You’ve created a custom Laravel Nova Card using the Nova Artisan command.
- You’ve added your card’s composer dependencies.
- You’ve installed your card’s NPM dependencies.
- You’ve compiled your card code using
npm run watch(ornpm run dev) and thennpm run prodfor your production build. - You’ve added your new card to your default Nova Dashboard.
- You’ve updated your Card.vue file to display a text input and a button to submit that input.
- You’ve created your send-mail route.
- You’ve tested your new card.
- Doesn’t that feel pretty good? Just lie to me and say “yes”.
Let’s close this thing out
Phew… that one was a long one, right?
At first glance, generating a custom card in Laravel Nova can feel really daunting. You’re expected to know lot of different things and it can feel like there are a lot of steps that can go wrong… but do me a favor and give it a shot. I promise you that it isn’t as bad as it seems. You’ll have one of those moments that programmers live for. It’s the “Ah ha!”, throw your hands up in the air, you did it moments.

As you make your way through the learning process of building administration panels in Laravel Nova you’ll feel more and more comfortable with all of the different facets of how Nova works. The more you build, the more you learn. That’s the point, isn’t it? Learn, progress, keep-on-keeping-on.
Don’t forget to check out our other posts on Laravel if you’re interested.
Oh, hey... and while you’re at it, give us a follow on Twitter and Instagram.

Co-founder & Lead Programmer
Matt Higgins
Matt is a co-founder, creative director, and programmer at Flywheel. He's made literally tens of people laugh in his lifetime and is always looking for the next problem to solve.
TOP